Pages

Saturday 18 February 2012

Mini-cakes

It's my mother-in-law's birthday on Sunday and I wanted to make a birthday cake for her. But as they are emigrating to Australia in two weeks time it really needed to be a small cake - enough for everyone to have a slice on the day and be gone.
I had an idea of what I wanted it to look like (almost one of the first images of a cake I ever downloaded from the internet and virtually my first pin in Pinterest) and decided to bake the sponge (gluten free so Jase could share it) in small pyrex ramekins, rather than bake a larger cake which would have to be cut to size after baking. A small victoria sponge mix (4oz each of flour, margarine and sugar plus 2 eggs) filled four ramekins perfectly. The only disadvantage of using the ramekins was that they flare outwards slightly, so I did need to trim the baked sponges to be straight-edged, but that was a minor point for something that actually worked very well.

The sponges were quite tall, so I used two cakes and sliced them in half horizontally, creating four layers. This did make quite a tall cake which proved tricky when it came to covering with fondant. The height of the cake (in relation to the diameter of the top) meant that the fondant hung in pleats around the bottom when I placed it on and it started cracking towards the bottom of the cake when I began to smooth it. The first attempt cracked so much that I decided to lift it off and start again with another piece. This worked much better and although it still cracked a little, I was able to cover these cracks with the pink fondant bow around the bottom of the cake.

I was pleased with how the flower on the top came out, although I should have left the layers to dry slightly longer as the petals started breaking away from the middle part of the flower. This didn't show when it was all put together and I was pleased with how the petal edged looked after I had "frilled" them.

I had two other sponges left so decided to make one more (smaller) cake and the decoration for this was also inspired by a Pinterest pin (two pins in one go - my pin to make ratio must be quite high!)

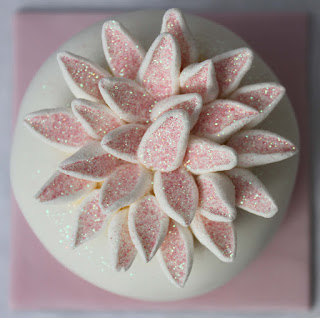
This one has a dahlia type flower on the top made from cutting mini marshmallows in half diagonally and dipping in edible glitter. The glitter only sticks the inside cut part, and the result is a pretty, glittery petal. I then put a blob of buttercream on the top (I wasn't going to make royal icing just for that) and placed the "petals" in circles, starting at the outside and working my way in. Again, such a simple but very pretty cake.

And for those of you keeping count (I only used three of the four sponges I baked), I filled the last sponge with lemon curd and buttercream and we all shared it for tea!

© 2012 Nicola Noble: Please observe the rules of copyright and blog etiquette. If you use my ideas or images, please link back to my blog. And do let me know - I'd love to take a look.

Monday 13 February 2012

Princess castle cake

My neighbour mentioned yesterday that she wants to make a princess castle cake for her daughter's birthday and I immediately lent her my cake bible (Debbie Brown 50 Easy Party Cakes) with the most gorgeous and simple castle cake in it.
I made this for Sophie's third birthday. Where Sophie's second birthday Miffy cake was a starting point for my home made/decorated cakes, this cake paved the way for the more polished and detailed cakes that I strive to make today. 

The bonus on this cake is that you use ready made swiss rolls, which can be bought from any supermarket, so the focus is totally on the decoration. This was the first time I covered the cake board and I wrapped the fondant over the edge of the board (rather than edge with ribbon, which I now think 
gives a neater finish - and is actually much easier!) 
The castle consists of three large swiss rolls and five mini jam rolls. Two of the mini rolls get a third taken off the top and that extra third gets added to two of the other rolls - this gives a range of heights for the mini towers adding extra interest to the cake. Each of the rolls (large and small) were then covered in buttercream and wrapped in white fondant. The join doesn't need to be perfect as you can arrange the towers with the seams hidden in the middle. A circle of fondant was then cut and placed on top of the rolls and the edges lightly smoothed. I cut a strip of fondant to wrap round the top of each of the larger towers and used a fork to make the indentations. 
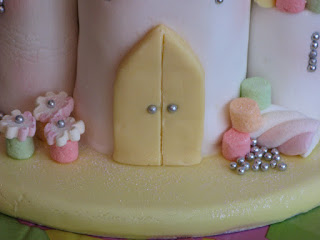
Then the fun began ... each mini tower was topped with a pyramid of mini marshmallows in lovely pastel colours (bought from Lakeland). These were "glued" together with edible glue (CMC powder mixed with water). The white fondant was dusted with pink lustre dust to add a blush of colour and silver balls were glued around the cake like arrow slits. I used a slightly darker yellow fondant for the front door and some triangular windows. I also found a bag of fun marshmallows at our local corner shop and used these as extra decoration. Fantastically, the "stripy" shaped marshmallow made wonderful flowers when cut into slices. Silver balls were also pooled around the bottom of the castle.

Even four years on, I still love this cake, with its lovely colours and simple design.
© 2012 Nicola Noble: Please observe the rules of copyright and blog etiquette. If you use my ideas or images, please link back to my blog. And do let me know - I'd love to take a look.

Miffy cake (or where is all began)

I can't believe my little girl will be 6 in less than one month - where has that time gone? So in a reminiscent mood I thought I would post about the first birthday cake I ever made for my little ones.

I always thought I could do a decent job of any birthday cake but for Sophie's first birthday we opted to get a "professional" to make her a chocolate number 1. The resulting cake was disappointing and so I decided that I would make the cakes myself in future. Sophie's second birthday had a Miffy theme and I wanted to make her a cake to fit the theme. I opted to do just the head and ears (rather than the whole body) and wanted to try covering it in fondant icing (which I had never used before). My wonderful mother agreed to help and we set aside two full days to bake and decorate the cake.

We baked a round cake then trimmed it to be slightly oval and cut two ears from another piece of cake. Despite the number of images of Miffy everywhere, it was quite hard to create a template as each of the images has very different ears (it's true - take a look for yourself!). I opted for an image of Miffy with more rounded ears and cut the template out of paper. I then placed these on the sponges and carved around the different pieces.

I still feel proud of the finished cake and even with more experience there aren't many things I would change (except for the uncovered board!). I twisted a rope of fondant and placed this to hide the join between the ears and the head and then added little flowers to make it prettier. I also stacked some fondant flowers to stand the candles in - rather than putting them in Miffy's head - ouch!

Overall, a very simple but cute cake which was the start of my cake journey!

© 2012 Nicola Noble: Please observe the rules of copyright and blog etiquette. If you use my ideas or images, please link back to my blog. And do let me know - I'd love to take a look.

Wednesday 8 February 2012

Herman, the German friendship cake

I recently saw one of the school mum's passing on a strange bowl of gloop to someone and, my curiosity piqued, I had to ask her what it was. She told me that it was a German friendship cake and that if I wanted she would "grow" me one but that it would take a week or so. 

I forgot all about it but 10 days later she duly handed over Herman with a printed sheet of instructions and off we went.
This is Herman on Day 1
Herman (as he is affectionately called) is a sour dough and you have to look after him for 10 days, stirring daily and feeding him twice before baking him. The mixture bubbles away in a very satisfying fashion ...
But why is he called a friendship cake I hear you ask? Well, before you bake him, you split him into four portions. Portion 1 gets baked, portions 2 and 3 get passed to friends and portion 4 grows you a whole new "Son of Herman".

I baked Herman today, adding apple, raisins and almond flakes and he smells and looks delicious.

I had difficulty getting him out of the tin and he broke apart but that could be that I was too impatient and didn't wait until he was fully cold or that I didn't line the tin with greaseproof paper which would have stopped this. As a result I haven't been able to get many presentable "fingers" but never mind - the crumbs taste just as delicious and that way I don't know how many pieces I have actually eaten and so don't need to feel too guilty!

The sons of Herman have already been adopted (one is being called Hector and the other's name is still to be decided) and I hope that their new families have as much fun with them as I have with Herman!!

Below are the instructions I was given.

German Friendship Cake (Herman Cake)
What to do if I give you a Herman cake.
Hi, my name is Herman and I’m a sour dough cake. I'm supposed to sit on your worktop, without a lid on, for 10 days, during which time you should feed me. 

You should not put me in the fridge or I will die. If I stop bubbling, I am dead.

Day 1: Put me in a large mixing bowl (2+ litres) and cover loosely with a tea towel or cling film.
Day 2: Stir well
Day 3: Stir well
Day 4: Now I need feeding. Add 1 cup each of plain flour, sugar and milk. Stir well
Day 5: Stir well
Day 6: Stir well
Day 7: Stir well
Day 8: Stir well
Day 9: I’m hungry again! Add the same ingredients as Day 4 and stir well. Now divide me into 4 equal portions. Give portions 2 and 3 away to friends with a copy of these instructions.
Keep portion 4 for your next cake and follow these instructions to grow me again.
Day 10: Now you are ready to make the cake:
Stir well and add the following:
1 cup sugar 
1/2 tsp salt
2 cups plain flour
2/3 cup of cooking oil
2 eggs
2 tsp vanilla essence
2 cooking apples cut into chunks
1 cup raisins
2 heaped tsp cinnamon
2 heaped tsp baking powder 
Optional extras like cherries, nuts, chocolate chips, coconut etc

Mix everything together and put into a large greased baking tin. Sprinkle with a 1/4 cup of brown sugar and a 1/4 cup of melted butter.
Bake for 45 minutes at 170‐ 180C.
When cold cut into finger pieces.
The cake freezes well and is also delicious warm with cream or ice‐cream.

Thanks to the website Herman the German friendship cake for also posting instructions on how to start your very own Herman.

Starting Your Own Herman
Ingredients:
460g flour
500ml milk
230g sugar
90ml warm water
2 tbsp active dry yeast

Instructions:
Sprinkle 1tbsp of sugar over the warm water
Sprinkle the yeast over this and leave in a warm place for around 10 minutes, as it grows to twice its size
Mix in the milk, sugar, flour to the yeast mixture and stir with a wooden spoon
Cover the bowl loosely with something like a tea towel
Keep in a warm place and stir. When you are ready, follow the 10 day cycle to make your Herman cake.