Pages

Sunday 31 March 2013

Happy Easter

Easter was so early this year that I didn't realise it was here until I looked at my calendar and realised that Sophie and Justin finished school the day before Good Friday!

I wanted to put a couple of decorations up and although I loved the eggs hanging from a branch that I put together last year, I didn't have time or inclination (the weather is just so cold here at the moment) to go searching for the perfect branch again this year. 

But a quick trip to our local garden centre, Squires, and I succumbed to a cute woven heart by one of my favourite home interior gift designers, Gisela Graham and I whipped up a cute decoration that I have hung by the front door - a little bit of brightness for a grey, chilly, snowy couple of weeks ...
Justin also had a Easter bonnet parade at nursery for the first time, so a few days before I pulled out a plain green hat and some Easter stickers and chicks that we already had. My only input was to stick a couple of feathers on the front and to provide the purple shredded paper for a nest on the top of the hat. Then I let him loose on it - it took all my restraint not to interfere and rearrange any stickers that I thought were too close/not in the right position but the overall effort of both of us paid off ... he won the prize for the best hat!!


© 2013 Nicola Noble: Please observe the rules of copyright and blog etiquette. If you use my ideas or images, please link back to my blog. And do let me know - I'd love to take a look.

Another giant cupcake and some disco balls ...

It was my good friend Lucy's 40th birthday this week and she had a party last weekend to celebrate. I offered to bring some cupcakes, as I'd seen some fun ones decorated to look like disco balls on Pinterest. 

I couldn't just do cupcakes though so decided to make another giant cupcake. I used a silicone mould this time and used the same quantity of cake mixture as for Sophie's birthday cake (see my previous blog post here). It came out of the mould very well, although I slightly overcooked the top this time. 
For this cake, I decorated the the bottom part of the cake with chocolate fingers. I wanted to do white chocolate fingers but couldn't find any so used milk chocolate fingers instead. I made some chocolate buttercream to stick the fingers on with, which was a good decision as white buttercream would have showed through the fingers. I made sure that I kept the fingers vertical as I went around the cake and it was very quick and easy to do (it took me no more than about 5 minutes!)
After making my daughter's giant birthday cupcake, I decided I needed a new nozzle for piping large stars and bought a very large plastic 8-point star. I then decorated the piped top with pink fondant stars and silver balls on the tip of each star. The whole cake sat on a board covered with pink fondant edged with a grey ribbon and I added Lucy's name and age in white which I then painted with silver lustre. 

I also made the promised cupcakes and decorated some as disco balls and the others to match the giant cupcake with piped buttercream and pink fondant stars.
To make the disco balls I coloured some fondant light grey. I rolled and cut this into long strips which I then cut into squares. Once these had dried, I painted with them with a silver sparkle lustre dust (mixed with vodka so the liquid evaporated and didn't make the fondant soggy). I topped the cupcake with a thin layer of buttercream and put the disco ball together: it proved to be a bit fiddly as, after I had put three rows of full squares on, I had to cut lots of little pieces to fit into the remaining spaces, such as long thin bits and triangular bits for the corners. The overall effect was good though and I finished it off with a healthy sprinkling of silver sparkle!
With a seven year old girl I can see I may do a disco themed party at some point over the next few years so will probably get to make these again, but next time I will try a different way. I will cut a circle of fondant big enough to cover the top of each cupcake and then I will cut the "mirror" pieces out of the circle so that I have all the pieces already cut, including the thin strips and corners ready sized up. I hope this will work and although it will need a bit more time and effort up-front, it should make putting the cakes together much quicker.

Lucy had a great party and seemed very pleased with the cupcakes and her surprise birthday cake so it was all worth the effort!

 © 2013 Nicola Noble: Please observe the rules of copyright and blog etiquette. If you use my ideas or images, please link back to my blog. And do let me know - I'd love to take a look.


Friday 29 March 2013

Cupcake birthday party - the giant cupcake cake

For Sophie's birthday I made a giant cupcake for her cake. This was the first time I have made one of these so I wasn't sure how to go about it and what it would turn out like. After browsing the internet I came across two tutorials on YouTube that I really liked: the shabby chic one was gorgeous but I decided was more suited for a grown-up cake rather than a seven year old; so the chocolate finger star one one was my inspiration (minus the chocolate fingers).
I baked a Victoria sponge in the Eddingtons Giant Cupcake pan (on loan from my niece). This didn't come with instructions but the people writing reviews on Amazon had given useful information on what to do. 
The advice was that the top of the cupcake is shallower so cooks faster than the deeper bottom. Rather then risk spoiling the bottom half by opening the oven part way into baking to put the cake mixture in the top half, I decided to bake both parts separately. The bottom half took a four egg Victoria sponge mix (with a little left over for a couple of cupcakes) and took about 1 hour 30 minutes in my oven (which is quite a slow oven) at gas mark 4 and the top half took a three egg mixture (again with a little left over) and took just over 1 hour to cook. The very bottom of the bottom half was still very slightly soggy but I wouldn't have wanted to cook it for much longer as the top would have dried out too much.

I had to trim quite a bit from the top of the cupcake to fit onto the bottom of the cake (there was a lot of overhang before the trimming). I then buttercreamed the bottom half of the cake making sure I had enough in the ridges. I had decided I wanted to cover the bottom with bright pink fondant and so I rolled a long strip, wide enough to fit all the way around the cake. I cut a straight line along one long edge and then placed this straight edge along the bottom of the cake against the covered board. I then trimmed the ends to meet at the back of the cake and gently folded the fondant over the top of the base. I then worked the fondant into each of the ridges of the cake with the flat of my nail/finger tips, going round several times. After about three times round, the ridges stayed and looked like a cupcake case.

I added some more buttercream into the gap in the middle where the fondant folded over the bottom half of the cake and placed the top part of the cake on. I coloured up some buttercream turquoise (it wasn't meant to be so strong a colour but matched well with the invitations etc). I then piped stars all around the cake and added butterfly sprinkles and silver and pearl balls onto the peaks of the piped stars. I finished with a wire spray that I had made about a week earlier (to let the fondant harden) of stars and a number 7. This was the first time I have done wire sprays so I was pleased with how it came out. Next time I would only put one shape on each wire (I had tried two or three with this one and it made them a bit heavy) and have a few more wires. I fixed the wires into the cake using a posy pick but  this was a bit wide (I had to stuff it with fondant to fix the wires in) so next time I would use a plain old straw!
I finished off the cake by added Sophie (with little white butterflies stuck to each letter) and a matching turquoise ribbon to the board and silver happy birthday wording.
The giant cupcake didn't turn out as big as I expected but it was still a good size. We didn't cut it at the party as each of the girls got to take home the four cupcakes they had decorated, so we kept it for Sophie's actual birthday two days later. Lucky girl got to blow the candles out twice!

© 2013 Nicola Noble: Please observe the rules of copyright and blog etiquette. If you use my ideas or images, please link back to my blog. And do let me know - I'd love to take a look.

Saturday 16 March 2013

Cupcake birthday party

Sophie's 7th birthday party was last Saturday and it was a great success.

I had done a fair amount of preparation for it over the last month, so the last few days before the party were really rather relaxed - all I had left to do was bake 50 odd cupcakes for the girls to decorate, colour up a gallon of butter icing and make the birthday cake.

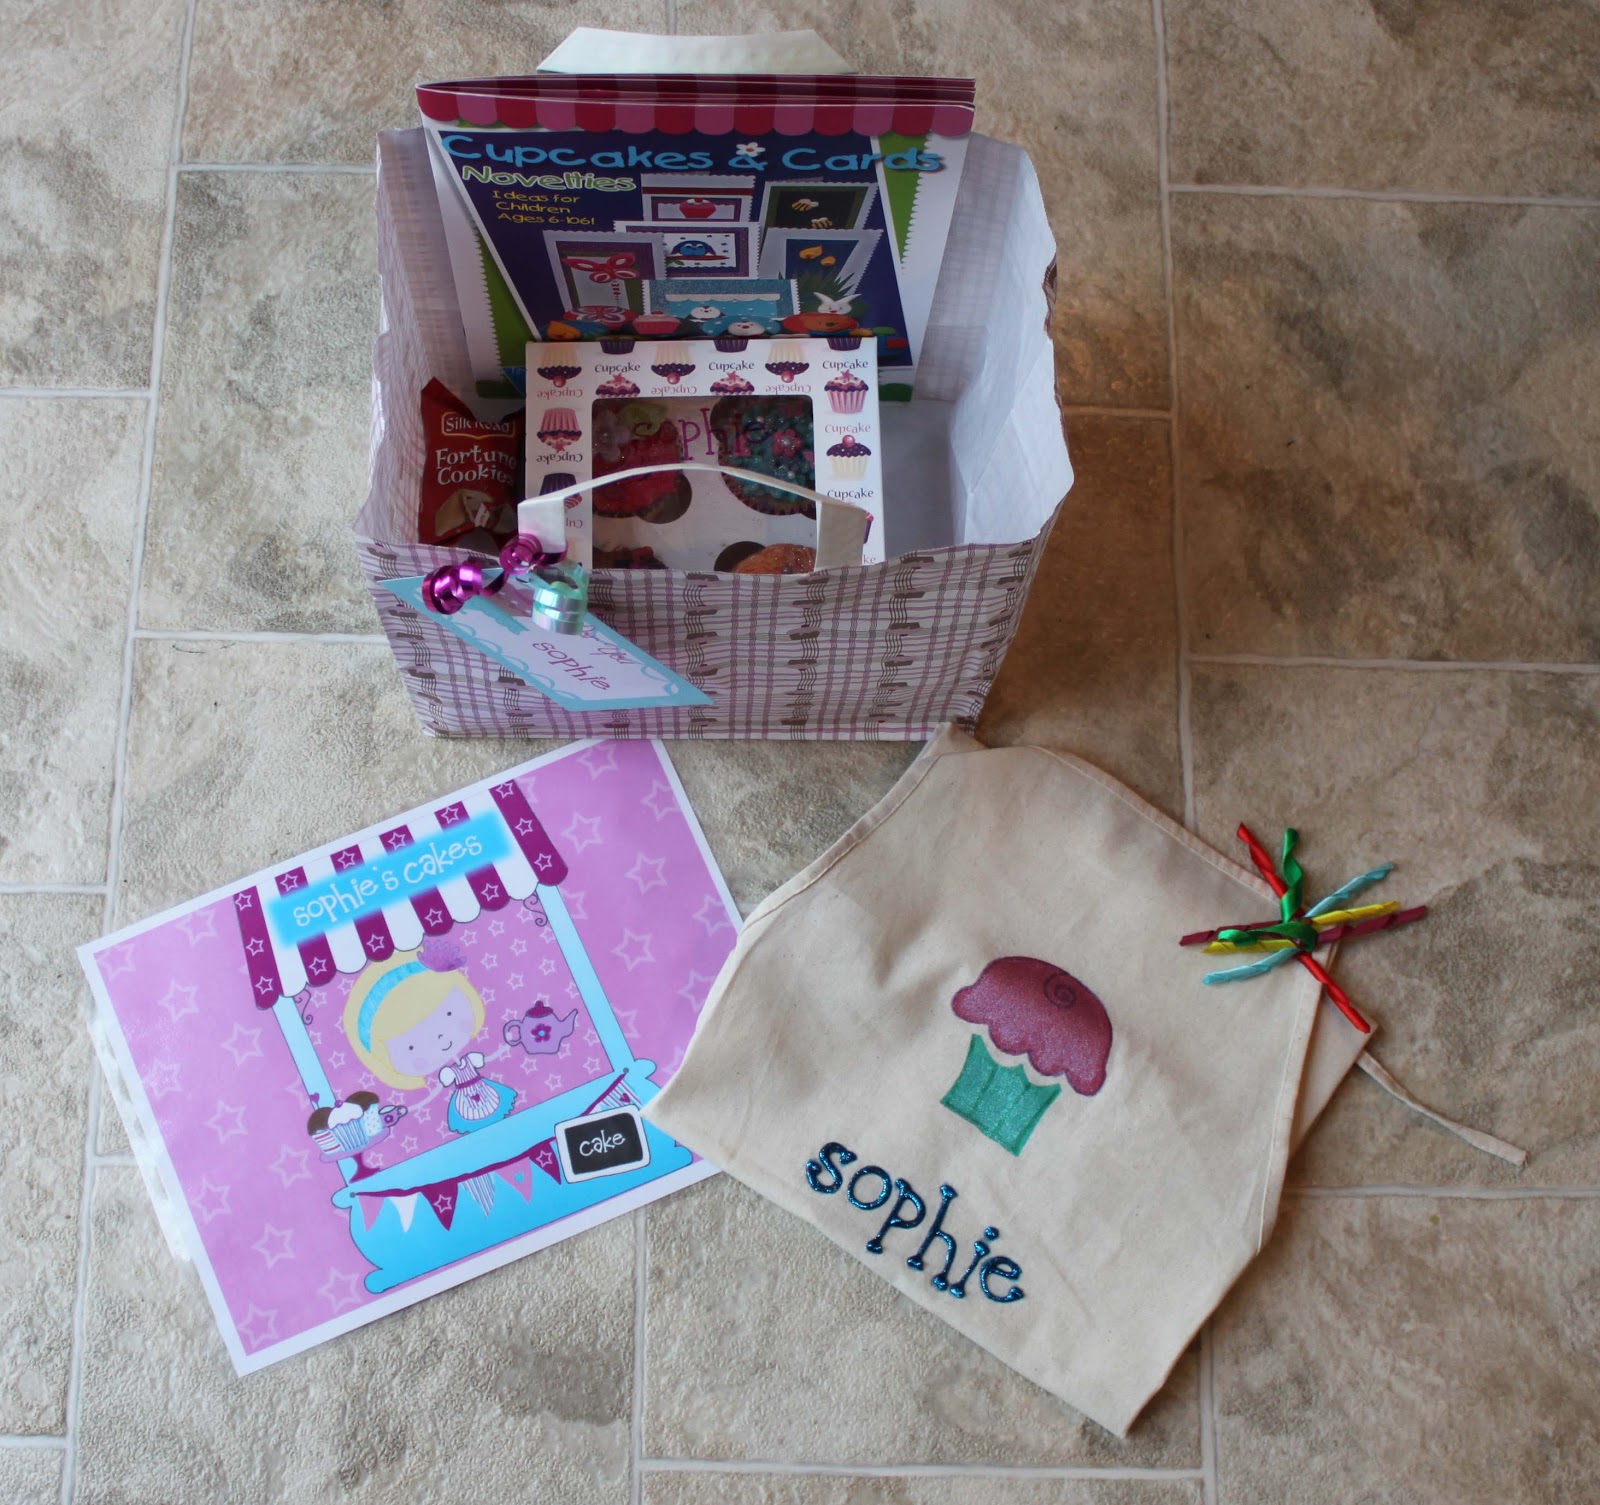
I didn't plan to do much in the way of going home gifts as the girls were having a personalised apron each and were going to decorate and take home four cupcakes each; but one thing led to another and they ended up with a lovely selection of other things too.

There is a wonderful tea and cake shop in Twickenham called Sweetie Pies Boutique Bakery, and I knew that they had gorgeous paper bags with cupcakes printed on, big enough to hold a four cupcake box. I often pop in for a cup of tea and a warm scone with cream and jam (well not that often otherwise I would have to run twice twice as much as I do!) and they very kindly let me have 10 bags for the party girls. I found and downloaded a cute cupcake tag which I personalised and attached to each bag.
In addition to the personalised aprons (see my previous blog here) and the box of cupcakes (I was really lucky in the timing when I bought these as they were 50% off in Sainsbury's), I also created a personalised laminated mat for each girl and I was given some amazing cupcake decorating books by the very generous Ann Pickard (who makes all the cupcakes for a brand new magazine called Cupcake Kate). We also popped a fortune cookie into each bag for luck!
The party was held at our local community centre (Sophie has had her last few parties there as it's five minutes away, amazingly cheap to hire and has a fully functioning oven which is great for cooking pizza). There is loads of space and the tidying up takes very little time. It worked very well this year as we set up four "stations" for each of the party activities: a pizza station; a cake decorating station; a smoothie station; and a food table. We decorated the hall with some beautiful cardboard bunting, some pink tulle and crepe flowers that I had kept from Sophie's fifth birthday, some paper honeycomb balls and lots of balloons - pretty!
The "pizza station" had a personalised paper plate for each girl and they put the toppings of their choice onto a pitta bread. Toppings included ready made tomato sauce, ham, pineapple, olives, sweetcorn, yellow pepper, cherry tomatoes and cheese. The named plates meant that once cooked, we could be sure each girl had the pizza she had made!
The "cupcake station" had the laminated mats for each girl with a decorated paper plate. There was a choice of five different coloured butter icings, bagged up with a selection of different nozzles, and sealed at the end with a couple of twists of the bag and a bag clip to stop it getting too messy.
I chose a selection of sprinkles that I thought wouldn't be too messy (ie avoiding the non-pareils/ hundreds and thousands I could picture going everywhere) including tiny butterflies, silver and pearl balls, red heart sprinkles, some loveheart sweets and M&Ms plus a few fondant flowers and stars that I had pre-cut. I also provide the girls with a selection of bright coloured fondant sugar paste and some cutters (flowers, leaves and stars). 
Essential items also provided were a couple of simple chopping boards that I use for my cake decorating, various small rolling pins and an icing sugar shaker for use when they were cutting shapes out of the fondant. I also placed a damp j-cloth for each girl to wipe their hands on if they got sticky and these were brilliant (I cut a full size one in half for each girl).

Each girl got to decorate five cupcakes - four to take home and one to eat at the party. Once I showed them how to hold and use the piping bags and how to cut the fondant shapes, they let their imaginations and creative skills run wild and we were all really impressed with how lovely the finished cakes turned out. These then got put into their cupcake box (which I had named) and the filled boxes then got put into their party bag, ready to take home.

I provided milk and various fruit for the smoothies: frozen strawberries and blackberries that we had picked at the end of last summer; bananas (that I peeled and froze the day before); tinned mango; milk; and apple juice for those who didn't like/couldn't have milk. The frozen fruit meant that we didn't need to add any ice or ice cream to thicken the smoothies. The finished blended smoothie got poured into a glass bottle with a cute pink stripe paper straw.
The bottles were another amazing find. I have seen lots of parties with gorgeous glass bottles for the drinks and I wanted to do the same. Doing my research before the party, it turns out the old school milk bottles that can be bought online only hold 100ml which really is about a mouthful and a half. I was really lucky to visit a garden centre cafe near to my mum's house and saw some perfect bottles on their tables holding flowers. After asking if I could have some (nothing ventured, nothing gained) the cafe told me they had no glass recycling facilities and were very happy to give me some. I took five with me and my mum collected the rest a week later (labels already removed to boot!) I tied white and pink raffia bows around the top and added a pink stripe paper straw to finish.

The "food table" was covered in a cupcake table cloth which was pretty but the bottles didn't really show up that much - a plain cover may have worked better but I did like the bright cupcake cloth.
The pizzas were served and I have to say the girls ate every bit of them, so much so that they took a long time to eat their food and didn't get around to the other bits of food on the table and their fifth cupcake until just before the parents arrived.
Despite a few tears from the party girl at the beginning (isn't that part of every party?) the whole thing went really well. Even Justin enjoyed it, despite being surrounded by 10 big girls; he made his own pizza and decorated his own cupcakes, eating half of them there and then! I even heard a few of the girls telling their parents that it was the best party they had EVER been too and that they wanted the same thing for their parties!

I really couldn't have done it without the support of my amazing family, Mr Snowballs (in charge of pizza making and helping with cakes) big sis (in charge of smoothies and helping with cakes), my mum (being everywhere she was needed right when she was needed) and my dad (in charge of the vacuum cleaner at the end of the party)! I really do value their support and know there is no way my children could ever have the parties they do without them - thanks xxx
© 2013 Nicola Noble: Please observe the rules of copyright and blog etiquette. If you use my ideas or images, please link back to my blog. And do let me know - I'd love to take a look.